
Submitted by pwadmin on
Certain types of pages, mainly Photo albums, will need you to upload files in a way different than the one described below. Please see the Site-specific help section for more details.
To embed an image in the body of a page:
- Find and edit the page that you want to add an image to.
- Put your cursor on the part of the page where you want the image.If you want the image off to the right, with the text going around it, click somewhere in the first line that you want to hit the side of the image.
- Click the
 Insert/edit image button in the toolbar. The Insert/edit image dialog will appear.
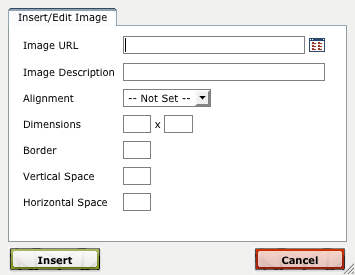
- Click the
 Browse button next to the Image URL field. A file browser dialog will appear.
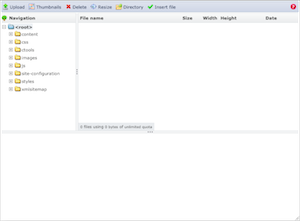
- If the blue <root> folder is selected, click on the content folder.You can only upload and delete files from the content folder because the other folders, including <root>, are needed by Drupal.
- If you haven't already uploaded the image:
- Click the
 Upload button. An upload dialog will appear.
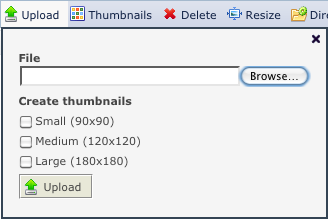
- Click the Browse... button andfind the file on your computer. When you have selected it, click the Open button.
- Optional: if you want Drupal to create smaller copies of the image for you, check the boxes next to the thumbnail sizes you want in the Create thumbnails section.
- Click the
 Upload button in the upload dialog, and wait for the file to finish uploading. You will notice that the file's name and some details will show up behind the Upload dialog, in the table in the right-hand column of the file browser.
 - Close the Upload dialog by clicking the x in the top-right corner.
- Click the file you want to link to in the table in the right-hand column of the file browser. The background must turn blue before you can proceed to the next step.Double-clicking does not work — the file will only flash blue and will not be ready!

- Click the
 Insert file button. The file browser will close, and you will be returned to the Insert image dialog. An Image URL will be filled in for you.
 - Add an Image description. A good Image description should simply states what is in the picture and why it is there. Search engines, blind visitors and visitors with slow internet connections will only see the image description.For example, "girl inviting you to join our website" is a better image description than "girl in a pink dress, waving" because it states what is in the picture, and why the image is there.
- Optionally, set an Alignment. Here is what the options mean:
- Left: The picture will go to the left of the page, and the text will wrap around it.
- Right: The picture will go to the right of the page, and the text will wrap around it.
- The other options make the picture act like a letter in the text (and are likely not what you want):
- Baseline: The bottom of the picture lines up with the bottoms of most letters (except g, j, p, q and y).
- Top: The top of the picture will line up with the top of the line.
- Middle: The exact middle of the picture will line up with the exact middle of the line.
- Bottom: The bottom of the picture will line up with the bottom of the line (below g, j, p, q and y).
- Text top: The top of the picture will line up with the top of the highest letter on the line.
- Text bottom: The bottom of the picture will line up with the bottom of the lowest letter on the line.